Building Networks
For an overview of networks and how to build them in Simbrain, see the building networks video. This page focuses an adding nodes and configuring screen objects. Be sure to familiarize yourself with Simbrain’s key commands, which were carefully designed to allow for fast editing.
Basic editing is straightforward, and most actions are meant to be intuitive relative to any standard draw program which involves selecting, copying, and editing with double clicks etc. For the most part you simply left click and drag the selected items (more on selection below). Network models can be lasso selected and the selection edited using the shift key to toggle selection.
One of the advantage of Simbrain is that almost any object can talk to any other object. Neurons can be connected to neurons in neuron collections, or can even communicate with synapses via couplings or custom simulations. Neuron arrays, neuron collections, and most subnetworks can all be linked by either weight matrices or synapse groups.
Creating and Deleting Objects
Most items are created using the Insert menu in the menu bar or in the right-click context menu. The add button in the toolbar adds nodes. The delete button deletes any selected objects
-
Creating a node: Nodes are created by pressing
Nor by pressing the new node button in the toolbar. Any new nodes will be created at the last position clicked on-screen. -
Creating a line of nodes: Repeatedly pressing
Nor the new node button results in a line of nodes being created beginning at the last clicked position. -
Creating specific types of neurons: By default, new nodes are linear. To change one or a group just double click on them to edit them.
-
Add neurons dialog: To create many nodes at once one can go to
Insert > Add Neurons(keyboard shortcutN) and instantly create an arbitrary number of neurons specified in the Add Neurons window. You can determine what type of neurons will be created (this part of the dialog is the same as the neuron dialog) and how they will be laid out (see layouts). -
Copy / Paste / Duplicate: Create a node, set its type (as specified above), and then copy and paste or duplicate (Cmd/Ctrl-D) repeatedly.
-
Creating subnetworks or collections: Subnetworks are created using
Insert > Add Subnetwork. Subnetworks and small groups of neurons can be created, copied, and repeatedly pasted to quickly create many sets of similar elements. Neuron collections can be created using thegcommand; existing free neurons can be added to a neuron collection withCmd/Ctrl-G. -
Creating synapses or synapse groups: See connecting items together.
Nudge, Zoom, Pan
-
Nudging: For fine tuning a selection, users can also use the arrow keys (with Shift held down) to nudge selected items. The nudge amount in pixels can be set in the network preferences dialog.
-
Zooming: To zoom use the mouse-wheel or the pinch-to-zoom gesture on trackpads, toolbar buttons, or the
View > Zoommenu.Reset Zoomsets a fixed 100% scale (1:1).Auto-zoomis different: it continuously fits the full network in the window and can be toggled from the toolbar orView > Zoom > Auto-zoom. When Show numeric overlays is enabled, zooming in far enough also reveals numeric values on neuron arrays, weight matrices, tensors, and related connectors. -
Panning: To pan press the Cmd/Ctrl key while left-clicking and dragging. Note that by default auto-zoom is turned on; if you plan to zoom in and pan a lot, turn it off using either the auto-zoom toolbar toggle or
View > Zoom > Auto-zoom.
Graphical and Color Conventions
Most graphical and color conventions can be customized using the preference dialog. Neuron, synapse, neuron array, and other color conventions are discussed on the doc pages for those objects. The precision of displayed activation values and tooltips can be configured in network preferences.
Selecting Objects
Neurons, weights, groups, and textboxes can be selected so that operations can be performed on the selected group of items (e.g., randomizing selected items, nudging them up or down, etc.). Selecting neurons and weights is important, because many Simbrain operations apply to selected sets of weights and/or nodes. Groups are selected by their interaction boxes. The selection interface basically works the way most computer drawing programs work. Use the left-click button to “lasso” or “rubberband” screen items. Once some items are selected, you can hold down the shift key and single-click to fine tune your selection.
Note that most selection operations must be done in selection mode, the default mode, which is entered by pressing “S” or the selection button.
-
Lasso: Left-click and drag the lasso around screen items you want to select. As items are selected a box appears around them.
-
Lassoing weights: It can be hard to click on individual weights directly, so they can also be selected by dragging the lasso across the line associated with a weight, which is much easier.
-
Single click: Single left-click on nodes and weights to select individual screen items. Zooming in on items can facilitate this.
-
Shift key: Once some items are selected, you can hold down the shift key to add more items to your selection. Hold down Shift while lassoing to add or remove groups of items; hold down Shift while single-clicking to add or remove single items.
-
Key Shortcuts:
Nto select all nodes;Wto select all weights;AorCmd/Ctrl-Ato select all nodes and weights. These are super useful! (Also, once selected:Rto randomize,Cto clear, and arrows to increment activation.)
Source and Target Objects
One common motif used for several operations in Simbrain is a source-target operation, where one set of models is designated as source (red), and the other as target (green). This is used to connect neurons, neuron collections, and neuron arrays together, to visualize weights, and to create supervised models.
Here are some source and target neurons which are about to connected in a feed-forward way.
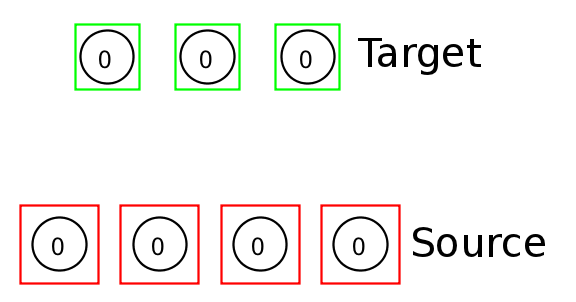
This technique is used in connecting neurons, neuron collections, and neuron arrays together, in using immediate learning, and in other ways. It is one of the few cases where we had to come up with our own new UI innovation, but in our experience it’s quite easy to learn and get used to.
Generally there are three things to do, which we call the “1-2 and 1-3 tricks”
-
To designate objects as source select them and press the
1key. They will be surrounded by a red border. You can also use menu commands like right click and selectSet Source Neurons. -
To designate objects as target select them as usual.
-
Followup actions use number keys
2or3to connect things (see below for the difference). -
To deselect source objects click on an empty space in the network and press
Escor1. You can also use menu commands like right click and selectClear Source Neurons.
Interaction Boxes
Many items in Simbrain have interaction boxes, which look like this:
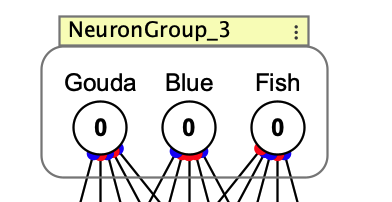
The example shows an interaction box for a neuron collection called “NeuronCollection_3”
You can drag things by the interaction box, right-click on them for a context menu, or double-click on them to open a dialog.
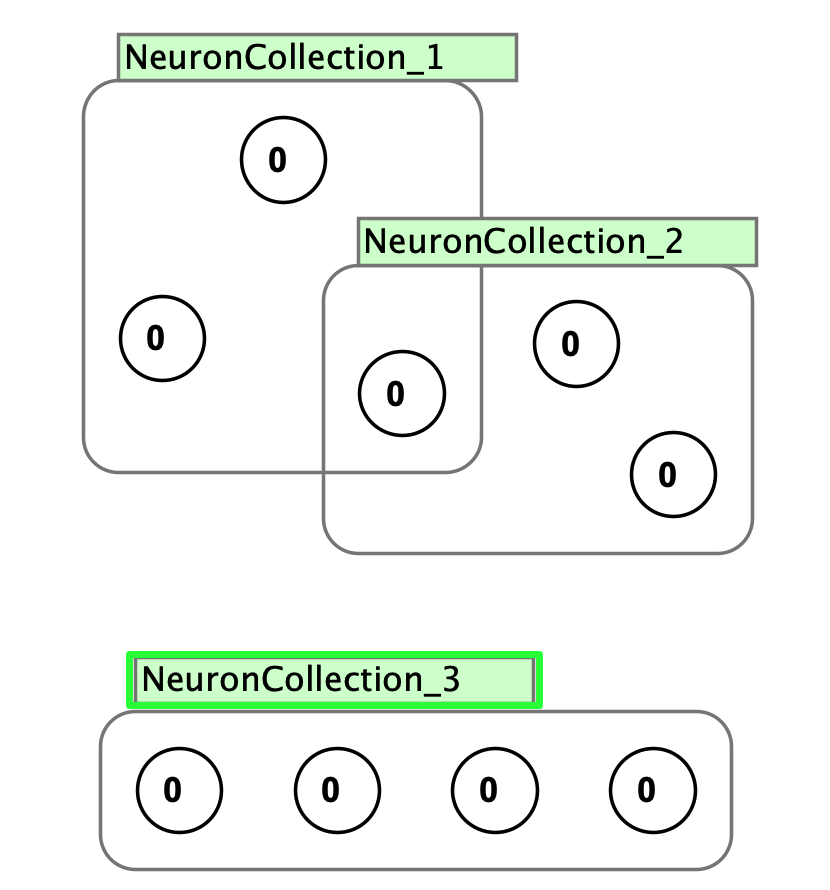
Transient Wrappers vs. Permanent Objects
Some objects like neuron collections and supervised models are transient wrappers around other objects. When they are deleted by their interaction boxes, the objects they wrap are not deleted. They are designated by green interaction boxes.
Subnetworks are linked to the objects they wrap. If you select their interaction boxes and delete them, all the objects they contain are also deleted. They are designated by yellow interaction boxes.
Tldr: if the interaction box is green, it’s “temporary”. If it’s yellow it’s more permanent.
As a result of this neuron collections and supervised models can overlap one another. Shown here is an example
Connecting Items Together
There are three main ways to connect neurons to other neurons (or to themselves) with synapses. This relies on the concept of source and target nodes. The same ideas can be used to connect neuron arrays, neuron collections, and other structures together.
Video instruction on connecting neurons is here (6:36 in the building networks video).
Note that these methods are designed to respect neuron polarity, if it is used.
Quick-Connect (1-2 and 1-3 tricks)
The quick and easy way to connect neurons and groups is with the 1-2 and 1-3 tricks.
1-2 Trick: Quick Default Connections
To use this method: Select your desired source neuron(s), designate them as source by pressing 1. Select your desired target neuron(s) then press 2 to connect them. Press Escape to clear source designations when done.
What the 1-2 trick does:
- Free neurons: Connects with All-to-All, 100% excitatory, no self-connections. Press
Shift+2to allow self-connections. - Neuron collections/arrays (Layers): Creates a weight matrix connection
Note that when creating recurrent connections the same neurons will be both sources and targets. A quick way to make a recurrent network is to make a bunch of nodes and use keyboard commands: N, 1, Shift+2, A, R
1-3 Trick: Custom Strategy Connections
To use this method: Select your desired source neuron(s), designate them as source by pressing 1. Select your desired target neuron(s) then press 3 to connect them. Press Escape to clear source designations when done.
What the 1-3 trick does:
- Free neurons: Uses the connection strategy configured in Network Preferences (default: All-to-All with 50% excitatory/inhibitory)
- Neuron collections: Creates a synapse group instead of a weight matrix
Use the 1-3 trick when you want more control over connection patterns (e.g., sparse connections, distance-based, or mixed excitatory/inhibitory ratios).
Menu Commands
To use menu commands: Select your desired source neuron(s), designate them as source by right-clicking on one of the selected neurons and selecting Set Source Neurons. Then select target neurons and right-click to select Connect Neurons. This will open up a window that gives you the option of customizing your connection preferences.
Connection Strategies and Custom Scripts
More customized methods include application of our highly developed set of connection strategies and even more custom approaches using simulations.
Editing weights
Several dialogs exist for setting and polarizing weights according to our built-in distributions and visualizing the results with histograms. See synapse adjustment dialog.
Setting Properties
Many properties are set using a property dialog. For most items you can select in one of these ways:
- Double-click on of the selected items
- Right-click and select
set propertiesin the popup menu - Clicking command-E or selecting
network > edit > set neurons or network > edit > set weights
This works for single or in some cases multiple objects of the same type.
When multiple objects are edited and have inconsistent properties, this is marked by a null string: .... If the string is left as is nothing changes. If it is edited all selected objects take that property.
Examples:
- Set activation values for nodes: The activation value (and hence color) of neurons and the excitatory or inhibitory strength (and hence color and size) of weights can be manually adjusted. To do so, select one or more neurons and weights (both can be adjusted at the same time), and press the arrow keys (up/right to increase, down/left to decrease). The amount changed is set by the “increment” field.
- Clearing and randomizing values: Note that while screen items are selected, neuron values can also be set to zero by pressing “C” on the keyboard (weight values are not then set to zero, because this is equivalent to deleting them, which can be done with the delete key). Pressing “R” will randomize all selected screen items, neurons and weights.
- To clear nodes you select them and press
C - To clear weights you select them and press
Shift-C(this prevents accidentally clearing them) - To clamp nodes or weights use
Shift-F
Wand Tool
The wand tool is an alternate interaction mode for painting activity, changing values, creating connections, and pruning weights directly on the network canvas.
Copy and Paste
Selected items (including neuron collections, but not yet subnetworks) can be copied, cut, and pasted similarly to the way they are in most contemporary GUIs. Lasso select groups of items, then fine tune your selection using Shift to add or remove items.
Copy, cut, and paste in one of the following ways:
- Use standard keyboard shortcuts: control-C (copy), control-X (cut), control-V (paste).
- Use the network menu and select copy, cut, or paste.
- Right-click on one of the selected items and select copy or cut.
Smart copy/paste
Smart copy/paste makes it easy to build repeated structures. Copy neurons or groups, paste them, move the pasted items to set the spacing, then paste again. New pasted items follow the same offset, creating a paste trail.
The default paste trail is horizontal, creating left-to-right lines of neurons, neuron collections, or other copied items. To create a custom paste trail, paste an object, hold Option while dragging it to a new relative position, then paste again. A red line shows the offset that future pasted items will use.
When not using a paste trail, new objects are created at the last position clicked on screen.
Implementation details
Paste trails use two placement states:
graph TD;
    click_mode["Click Mode"]
    offset_mode["Offset Mode"]

    click_mode --"place object at last clicked location"---> offset_mode
    offset_mode --"click canvas/copy object"---> click_mode
    offset_mode --"place object using offset"--> offset_mode
Undo/Redo Capabilities
Network undo/redo tracks structural changes only. This includes adding and deleting network objects (neurons, synapses, neuron collections, synapse groups, subnetworks, text objects), moving objects, creating connections between neurons and collections, pasting and duplicating objects, and applying layouts to neurons.
Changes to neuron activations cannot be undone. Property changes (editing update rules, polarity, labels, or other settings via property dialogs) also cannot be undone. Changes to individual components within subnetworks cannot be undone separately; the subnetwork is treated as a single unit.
The Undo History dialog provides a visual list of all undoable and redoable actions, allowing you to navigate directly to any previous state without stepping through each action sequentially.